

Charts
The Charts screen is the full chart: your boat, the traffic around it, your waypoints and routes, and the weather. Open it from the Navigation tab of the screen selector.
The chart controls
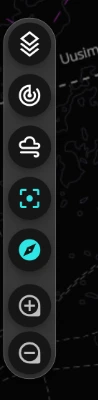
The buttons down the left side of the chart, from the top:
| Button | Tap | Long-press |
|---|---|---|
| Chart list | Choose a chart and the day or night colours | |
| Radar | Show the radar picture on the chart, or hide it | Radar controls |
| Weather | Show the weather or tidal stream on the chart, or hide it | Weather controls |
| Centre | Centre the chart on the boat | Lock the boat's position on screen, or unlock it |
| North up / Heading up | Turn the chart north up or heading up | |
| Zoom in, Zoom out | Zoom one step |
The radar button is greyed out when the boat has no radar, and turns green while the radar picture is showing and the radar is not in standby. Showing the radar also starts it transmitting; hiding it only hides the picture. See Radar.
The weather button turns green while a weather layer or the tidal stream is showing. With nothing chosen yet, a tap opens the list of layers. See Weather.
You can also zoom with two fingers or the mouse wheel, and drag the chart to move it.
Choose a chart
Tap the chart list button.
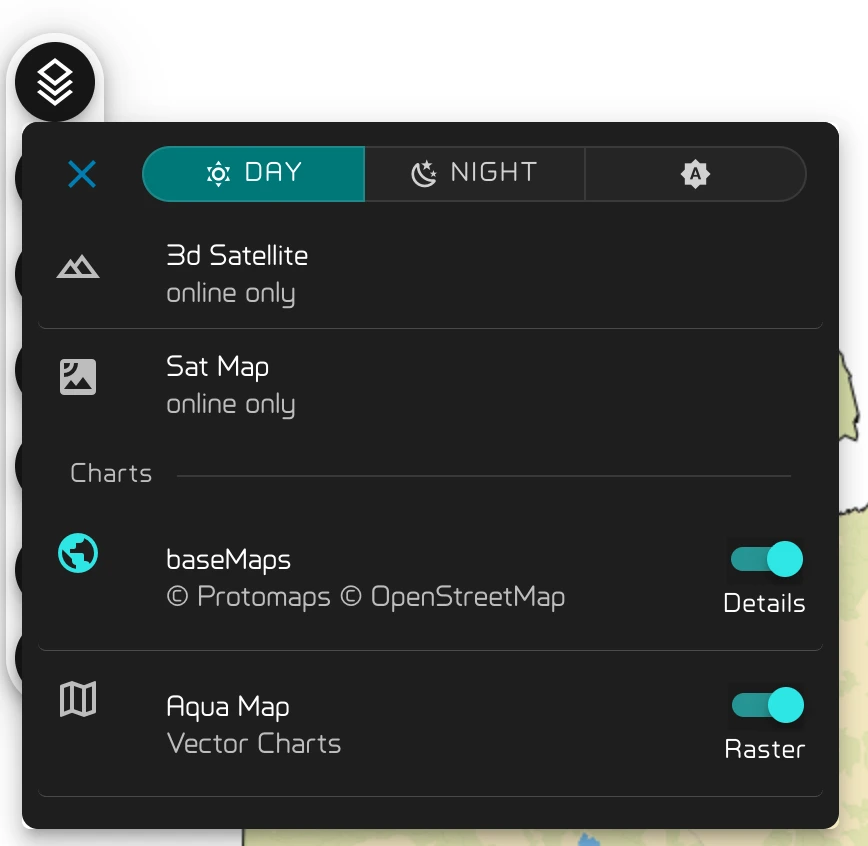
- Day, Night and the Auto button (an A in a sun) set the colours of the base map and Aqua Map. Auto follows the sun at the boat's position: day colours from sunrise to sunset, night colours from sunset to sunrise.
- 3d Satellite and Sat Map are marked online only: they need an internet connection and are greyed out without one.
- Under Charts are the charts on board:
- baseMaps, the world base map, once it is installed. Tap it to go back to it from another chart. Its Details switch shows the land in full detail, or as a plain area.
- Aqua Map, vector charts. Its Raster switch shows them as raster charts instead.
- OpenSource and Community, folders holding the other charts you have downloaded, with how many each holds. Community is always open; tap OpenSource to open it. Tap a chart to show it.
The list holds only the downloaded charts that cover the part of the world on screen. Move the chart and the list follows. While a downloaded raster chart is showing, Zora moves to the chart from the same source that best covers the view as you move around.
To put more charts on board, see Download charts.
Brightness
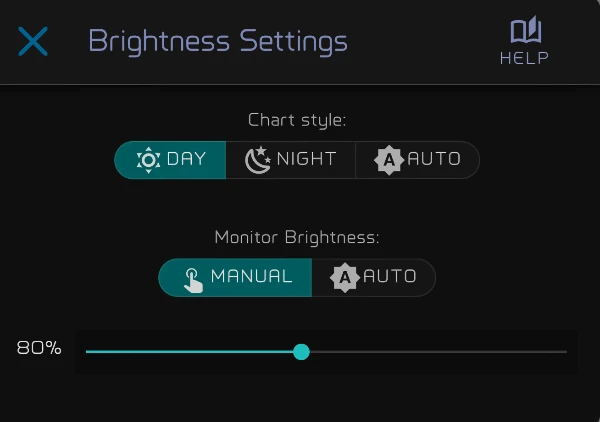
Long-press Auto in the chart list to open Brightness Settings. The same dialog opens from the brightness slider in the Tools panel; see Brightness.
- Chart style: Day, Night or Auto, as in the chart list.
- Monitor Brightness: in Manual, the slider sets this display's brightness, from 15% to 160%. In Auto, there is one slider per phase of the day: dawn, sunrise, day, sunset, dusk and night. The current phase is highlighted, and the display changes to that phase's level as the sun moves. Each display keeps its own choice.
Keep the boat in view
Tap the centre button to bring the boat back to the middle of the chart.
Long-press it to lock the boat where it is on the screen. It does not have to be the middle: put the boat near the bottom of the screen and you see more of the chart ahead, and Zora keeps it there as you sail. The button turns orange while the position is locked. Long-press it again to unlock.

With the position locked you can still move and zoom the chart to look around. Each time you touch it, a ring on the centre button counts down six seconds; then the chart goes back to the boat. Touch the chart again and the count starts over.
The lock lets go while you edit a waypoint or a route, or measure on the chart, and comes back when you finish. When you follow an AIS target, the chart goes to the target and a small badge shows on the centre button; after five seconds without touching the chart, it goes back to where it was.
The centre and north up buttons are greyed out on 3d Satellite and Sat Map.
North up or heading up
Tap the north up button to switch:
- North up keeps north at the top, like a paper chart. The button shows a compass.
- Heading up turns the chart with the boat. The button shows an arrow.

Tap the chart
Tap anywhere on the chart to see what is there, in the INFO tab of the Tools panel: the position, its distance and bearing from the boat, and on Aqua Map charts the details of what you tapped, such as a buoy, a light or a sounding. With the pilot chart or cyclone overlays on, a tap on them shows the figures for that spot.
Tap an AIS target, a waypoint or a route point, and the Tools panel opens on it instead.
Long-press the chart
Long-press anywhere on the chart. The chart moves to put that point in the middle, and a menu opens:
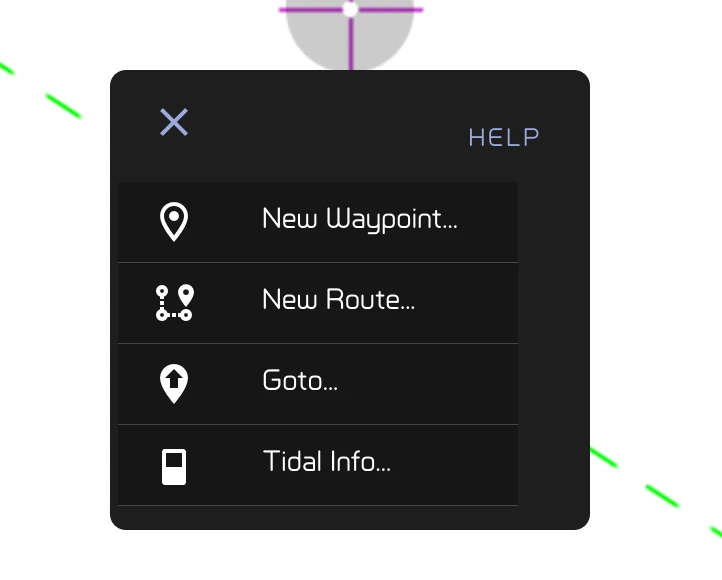
- Add to Route..., when a route is showing: adds the point to it.
- New Waypoint...: a waypoint at the point. Name it and save it.
- New Route...: starts a new route with its first point here. Long-press for each next point. See Routes.
- Goto...: go straight to the point.
- Tidal Info...: opens the Tide tab with the tide at the point. See Sun & Moon.
New Route... and Goto... are greyed out while a route is active. The menu closes by itself after five seconds.
Long-press a waypoint instead and its own menu opens: Info, Edit..., Goto... and Delete. Goto... is greyed out here too while a route is active, and Delete asks before it deletes.
Goto
Goto makes a one-leg route from the boat to the point and starts it at once. A bar across the top of the screen shows the bearing and distance to it, your course and speed towards it, the time to go and the cross-track distance, as for any active route.
To stop, tap the bar and tap stop.
The Tools panel
Tap the button on the right edge of the chart to open the Tools panel. It has three tabs:
- NAV: the tools listed below. While one is open the tab reads BACK; tap it to go back to the list.
- OVL: what is drawn on the chart. See Overlays.
- INFO: what you last tapped on the chart.
The NAV tab lists Waypoints, Routes, Tracks, Nav Tools, AIS Targets, Weather and Download Charts. Trackers is there when the boat follows GPS trackers, and Radar when it has a radar.
Waypoints
Open Waypoints in the NAV tab. Each waypoint shows its symbol, its folder, and its distance and bearing from the boat.
- Tap a waypoint to show it on the chart. Tap it again to let go.
- Tap the arrow on its left for its details.
- Long-press it to edit it.
- Its menu (⋯) has GoTo, Edit..., Export gpx and delete.
At the top of the list, the sort button orders the waypoints by distance to the boat, distance to the middle of the chart, name, or when they were last changed. The menu beside the title exports the ones shown or all of them as a GPX file, or imports a GPX file.
Edit a waypoint
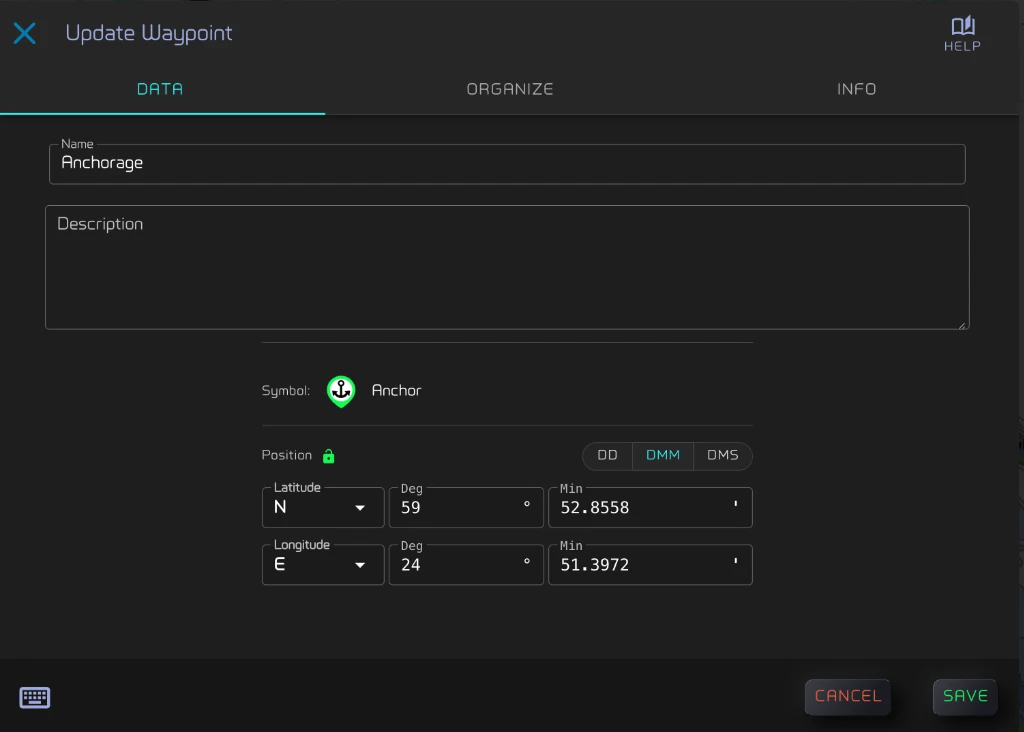
The Update Waypoint dialog (Save Waypoint for a new one) has these tabs:
- Data: the name, a description, the symbol, and the position. Type the position in degrees (DD), degrees and minutes (DMM), or degrees, minutes and seconds (DMS).
- Organize: its folder and tags. See Folders, tags and filters.
Folders, tags and filters
Waypoints and routes share folders, tags and filters.
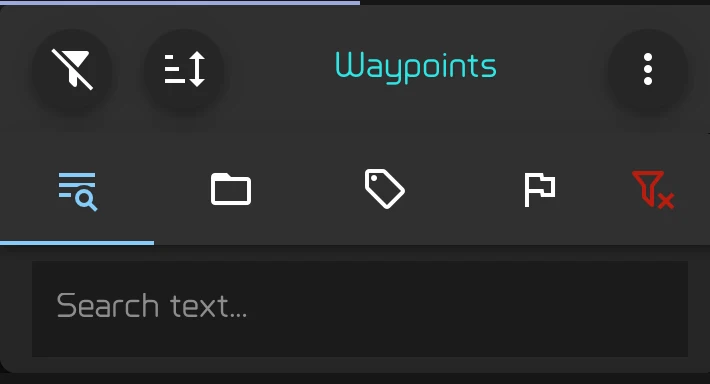
Filter the list. Tap the filter button at the top of the Waypoints or Routes list. Search the text (for a waypoint, its name or description), or choose a folder, tags or countries. The red button clears the filter.
Put a waypoint or route in a folder, or tag it, in the Organize tab of its edit dialog. Zora fills in its country from its position when you save it.
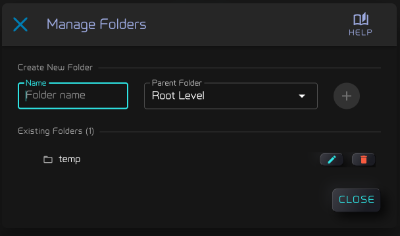
Manage folders. Tap the folder button beside the folder field. In Manage Folders, type a name, choose a Parent Folder to put it inside another, and tap +. Double-tap a folder, or tap its pencil, to rename it; press Enter to save or Esc to cancel. Deleting a folder moves the routes and waypoints in it to the top level. Folders inside it move to the top level too, with everything in them.
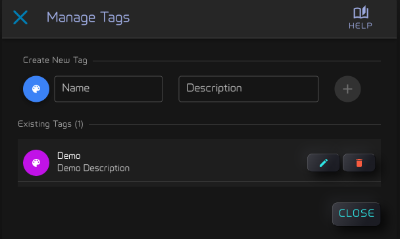
Manage tags. Tap the tag button beside the tags field. In Manage Tags, choose a colour, type a name and a description, and tap +. Double-tap a name or description, or tap the pencil, to change it. Tap a tag's colour to change it, then Set. Deleting a tag takes it off every route and waypoint that carries it.
Overlays
Open the OVL tab of the Tools panel. Tap an overlay to show it on the chart or hide it; the ones showing are in colour. Photos and Areas are struck through: they are not available yet.
Overlays: Auto pilot, AIS Vessels, AIS heading (the heading line of each AIS vessel; it shows AIS Vessels too), AIS Buoys, GPS Trackers, Grid overlay, Waypoints, Time Zones, UNESCO Heritage and Photos. Under Pilots & Tides: Pilot Wind, Pilot Current, Cyclone Tracks, Mag Var and Tide Gauges.
Navigation: Track, COG heading, HDM heading, HDT heading, Tack Line, Laylines, Line To waypoint, Areas and Stopped (the circle the boat swings in at anchor or on a mooring, shown by itself when it is anchored or moored).
Line settings
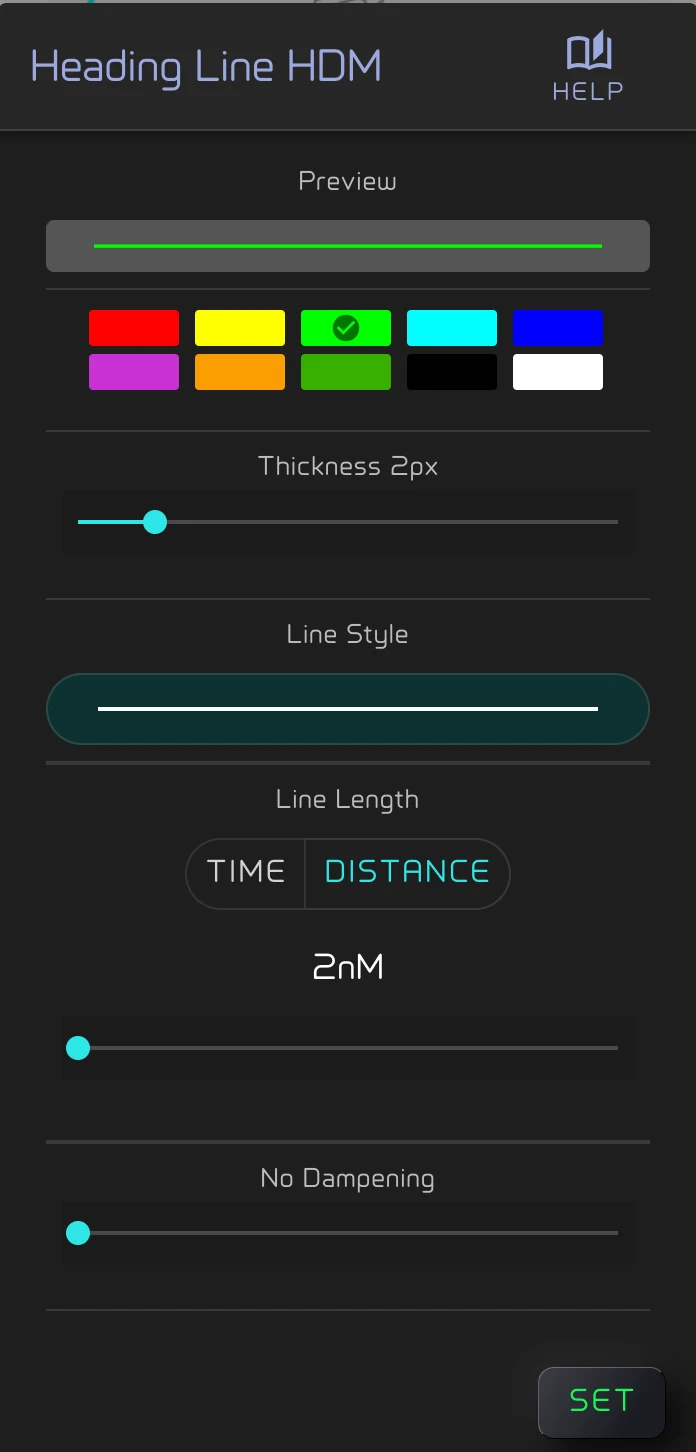
Long-press a line overlay (the heading lines, AIS heading, Tack Line, Laylines, Line To waypoint) to set how it is drawn, then tap set:
- its colour,
- its thickness and line style,
- its length, as a time (how far the boat goes in, say, 20 minutes) or a distance,
- dampening, which steadies a line that jumps about.
Not every line has every setting: Laylines have no length or dampening, Line To waypoint no length, and AIS heading no dampening. The settings are saved for you and apply to every chart you open.
Nav Tools
Open Nav Tools in the NAV tab for the navigator's traditional tools on the chart. Choosing one opens the INFO tab, where the results show. Each tool's menu (⋯) in the list has Clear, and Position Fix also has As Waypoint.
Distances
- Tap Distances.
- Tap the chart to place points. Each new point adds a leg. Drag a point to move it; tap it to remove it. Long-press a leg to add a point in it.
The INFO tab shows the Total Distance and each leg. Legs under 0.1 nm are in metres or feet. Clear in the tool's menu removes the points.
Position Fix
Fix your position from bearings on landmarks.
- Tap Position Fix.
- Tap a landmark on the chart.
- In Bearing, type its magnetic bearing, 0 to 359, as read on your compass, and tap Set. Zora draws the bearing line, corrected for the boat's magnetic variation. If the variation is not known, Zora takes it as 0°.
- Do the same for a second landmark, and a third if you can.
The INFO tab lists the bearing lines and, from two lines on, the Calculated Position. Three or more lines rarely meet at one point: Zora takes the centre of their crossings as the fix and shows an Accuracy, how far the farthest crossing lies from it. Tap a point on the chart again to change its bearing, or tap the × beside a line in the INFO tab to remove it. As Waypoint in the tool's menu saves the fix as a waypoint; Clear removes the lines.
Running Position Fix is greyed out: it is not available yet.
Download charts
Charts on board work with no internet.
- Open Download Charts in the NAV tab of the Tools panel, or in Zora's settings under Charts, Download Charts, then Go to Charts Download Screen.
- The chart opens where you were, with Charts Sources beside it. Move and zoom the chart to the area you want: the list shows what is available there.
- Tap a source to open it: AQUA MAP, BASE MAPS, and the community sources. The chart outlines its charts. Community sources are grouped by region, each showing how many of its charts you have.
- Tap available on a chart. The download starts at once.
The top of the list shows how many charts are waiting to download, their size and the space left on board; while a chart downloads, it shows its progress and how many charts remain. Zora keeps downloading if you leave the screen. A downloaded chart shows delete: tap it to remove the chart.
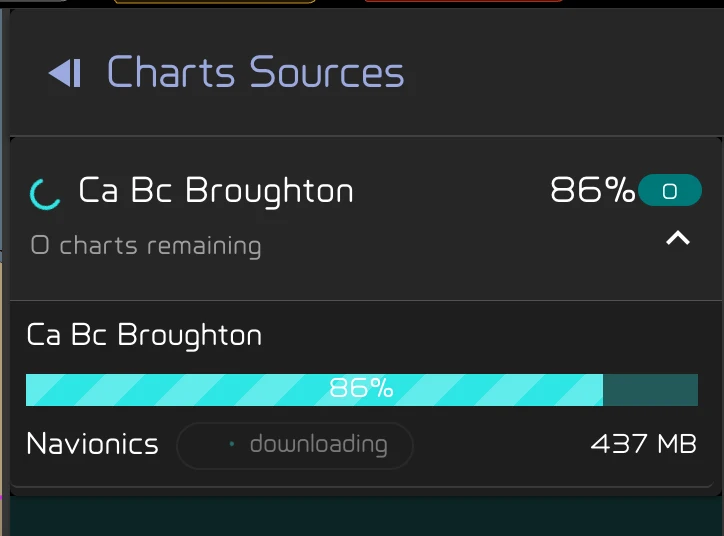
If a chart is still waiting or its download failed, Download Now starts it again. Zora checks first that there is room on board.
Chart Licenses at the bottom says what each kind of chart is. Community charts are not official nautical charts and must not be your primary source for navigation.
Once downloaded, a chart is in the chart list. The world base map has its own installer, in Zora's settings under Charts, Base Chart Installation.